Sehen Sie die Terminauswertung für einen frei definierbaren Zeitraum. So können Sie die Anzahl Ihrer Termine überblicken und mit anderen Zeiträumen vergleichen.
„Fehlende“ Gutschein-, Beleg- oder Ausgabennummern
Wenn Sie das Belbo Kassensystem nutzen, können Sie Ausgaben hinterlegen und Gutscheine verkaufen. Diese haben stets fortlaufende Nummern.
Weiterlesen
Eigenes Gutscheindesign erstellen
In Belbo können Sie Gutscheine über die Kasse und Ihren eigenen Online Gutscheinshop an Ihre Kunden verkaufen. Wir stellen Ihnen dabei einige farbenfrohe Designs zur Verfügung. Wenn Sie Ihr eigenes Design nutzen möchten, können Sie dies in Belbo hochladen.
Kasse: Ignorierte Leistungen
Falls bestimmte Dienstleistungen nicht im Kassiervorgang erscheinen sollen, können Sie diese hier definieren.
Create serial appointments
Wenn Sie regelmäßig wiederkehrende Termine in den Kalender eintragen möchten, können Sie dies ganz einfach vornehmen.
Serientermine eintragen
Wenn Sie regelmäßig wiederkehrende Termine in den Kalender eintragen möchten, können Sie dies ganz einfach vornehmen.
Buchungslink für Google My Business
Wenn Nutzer ihr Unternehmen auf Google finden sollen, macht es Sinn, einen Google My Business Eintrag zu erstellen. So können Kunden sich sofort auf der Suchergebnisseite näher informieren und auch direkt einen Termin bei Ihnen buchen.
Weiterlesen
Marketingfreigabe in der Kundenakte
Wenn Sie mit Belbo Newsletter an Ihre Kunden versenden möchten, müssen Sie sicherstellen, dass Ihre Kunden dem Erhalt von Newslettern explizit zugestimmt haben.
Weiterlesen
Steuerbüro: Verbuchung
In Zusammenarbeit mit Ihrem Steuerbüro können Sie festlegen, welche Erlöskonten für die Verbuchung Ihrer Dienstleistungen und Verkaufswaren genutzt werden sollen, wenn Sie hier unterscheiden möchten.
Ungültiger Kassenstand
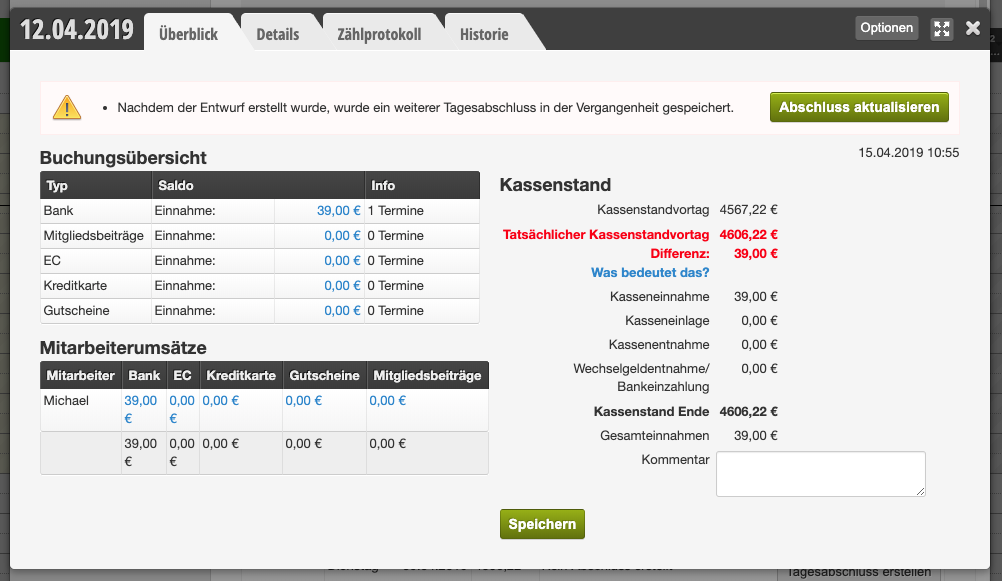
Falls Sie bei einem Tagesabschluss eine Warnung erhalten, dass der Kassenstand ungültig ist, liegt dass daran, dass Sie in der Vergangenheit liegende Tagesabschlüsse verändert haben und sich dadurch der Kassenstand geändert hat. Diese Änderungen werden ordnungsgemäß dokumentiert, führen aber dazu, dass auf den in der Zwischenzeit liegenden Tagesabschlüssen im Ausdruck einen ungültigen Kassenstand enthält.
Im Falle einer Betriebsführung werden derartige Phänomene wie ungültige Kassenstände sofort bemängelt und in der Regel der Zeitraum geschätzt. Achten Sie daher darauf, dass Sie täglich den Kassenstand zählen und vermeiden Sie nachträgliche den Kassenstand beeinflussende Änderungen vollständig. Der Grund liegt darin, dass eine den Kassenstand beeinflussende nachträgliche Änderungen beweisen, dass Sie die Kassenstände der Zwischenzeit nicht geprüft haben.
Wenn Sie aus einem bestimmten Grund eine nachträgliche Änderungen durchführen müssen (Diebstahl, vergessene Trinkgeldentnahmen, etc.) versuchen Sie die Änderungen ausführlich zu dokumentieren. Sie sollten dann nach Möglichkeit alle in der Zwischenzeit liegenden Tagesabschlüsse neu öffnen, neu generieren und neu ausdrucken. Alle Tagesabschlüsse werden dann mit einem Vermerk versehen, der nachvollziehbar ist.
Beispiel einer Warnung nach einer nachträglich vorgenommen, den Kassenstand beeinflussenden Meldung:

In diesem Fall wurde eine zusätzliche Kasseneinnahme vor dem 12.4.2019 hinterlegt, so dass alle darauf folgenden Tagesabschlüsse und bereits gespeicherten Tagesabschlüsse diese Warnung enthalten werden.
